Saturday, April 21, 2012

How To: Make Cheesecake Filled Strawberries with Tupperware!

I was in the grocery store this morning and saw the strawberries were on sale buy one get one free! I have a going away party to attend tonight so I figured I'd get some to bring. I was trying to think of something else to bring with them, but there wasn't very much "party-worthy" in my cupboards. Though I did find a box of No Bake Jello Cheesecake!

At first I thought I'd make strawberry cheesecake. Then I remembered having seen people on pinterest pinning cheesecake-filled strawberries and thought, "hmmm I could fill the strawberries with the cheesecake!" I looked to see how they did it. People mentioned filling them with cheesecake mix with a spoon... but I had a better idea!

Here's how I did it in under 20 minutes start to finish:


First I used a paring knife to cut the tops of the strawberries off, and then cut the middles out. This was the step that took the longest (10 minutes for 2lbs of strawberries).*

*NOTE It may have taken me a bit longer then it will take you since I do have neuromuscular disease & I'm on coumadin (blood thinner) so I cut slow plus didn't want to bleed all over the food. ;)

When I'm not busy creating stuff for my etsy shop, or working on D.I.Y. Projects for my daughter, I also sell Tupperware! It's not your grandmothers Tupperware though.


They have some fabulous new stuff including the Whip ’N Prep™ Chef and my latest favorite gadget, the Squeeze It™ Decorator!!! I used both of these items to make it quick and easy!


I used the Tupperware Whip 'N Prep™ Chef  to mix the Jello NoBake cheesecake mix. Took me under a minute to mix it!


Next I poured the cheesecake mix into the Squeeze It™ Decorator. It took me under 2 minutes to fill all the strawberries with this! it would have taken far longer by spoon and been far messier!


The other advantage to the Squeeze It™ Decorator over a spoon is it comes out looking fantastic! It comes with 5 tips (fine threads, closed star, open star, shell and filler) and I used the open star.

NOTE: Squeeze It™ Decorator is on sale til April 27th for $14 - regularly $23.50!


Next, I sprinkled the graham cracker crumbs on top that came in the box.

NOTE: If I didn't have a boxed mix, I could have used my favorite Tupperware gadgets - Chop ’N Prep™ Chef or Smooth Chopper - to make the same mixture quickly from graham crackers!


Finally, I drizzled  chocolate on the top! You can do this with the Squeeze It™ Decorator fine threads tip! :)

It's in the fridge cooling before the party in an hour! With just 20 minutes of time and a few awesome gadgets to make it quick and easy, I have a great treat!!!

Now I'm just sad to go say goodbye to my friend, who is moving to Brazil on Tuesday. :'(

 Pin It

Sunday, April 1, 2012

april iPad mania | iPad3 & kindle fire giveaway | little free radical

  WELCOME TO THE APRIL iPAD MANIA GIVEAWAY!!! 

Little Free Radical has teamed up with Bay Area Mommy
and some other awesome bloggers to bring you this amazing chance to win the two hottest tablets in the market today! 
  • Grand Prize: The New iPad (or $550 cash) 
  • Second Prize: Kindle Fire (or $200 cash) 
Entries will be accepted from April 1 at 12:01am EST until April 21 at 11:59pm EST
Additional Details:
  • There are no mandatory entries but there are lots of ways to gain more entries to to the giveaway. The more tasks you complete, the more chances of winning! 
  • Open worldwide. 
  • Must be at least 18 years old to be eligible for the prize. 
  • This giveaway is in no way sponsored, endorsed or administered by, or associated with, Facebook, Twitter, Apple or Amazon. 
  • Winners will be drawn on April 22 and will have 48 hours to respond to the notification email. Kindly include alice@bayareamommy.com to your email's whitelist to make sure that in case you are picked as the winner, the notification email would not go to your Spam folder. Good luck!

Wednesday, March 28, 2012

DIY decor with vinyl wall art | giveaway | little free radical

We have another great giveaway for you today from Vinyl Wall Art!
I've shared several times here recently about using vinyl decals with DIY projects including bookshelves & prant boxes.  I totally ♥ decals!  They are SO easy to use and far less time consuming then having to paint wall murals or detail work on smaller DIY projects! You can have a great piece of art in just minutes!

Remember our IKEA PRÄNT box hack? I used these awesome birch tree decals that Vinyl Wall Art was nice enough to custom-resize & inverse for me:


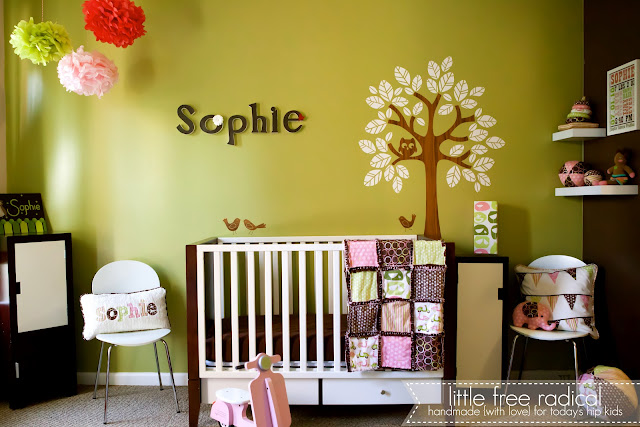
I love their decals - I first found them when I was pregnant and drooling over thousands of decal listings on Etsy. I wanted a tree for Sophie. I looked at dozens, but kept going back to Vinyl Wall Art's tree... And of course when I went to order their tree, I saw the birds! So I ordered the tree & the birds for Sophie's wall.

My husband painted her nursery on Mothers Day 2010 for me, and then after 2 weeks (recommended time for paint to dry before applying decals) he put them up for me:


Sophie loves her room, and one of her first words was "owl" (pronounced "all) - she'd stand in the crib looking up at her owl in the morning. She likes her birds along her crib rail too. :)


I loved Vinyl Wall Art's Forest Decal Kit but didn't have a good wall in her room to use them, so I figured when we buy a house, I'd put them in her new room! 

Then one day, my college roommate, who is adopting a baby from Korea,  posted photos of her daughters room which have the tree decals I love, so I asked her if I can post some pictures of Zoey's room!

Pin It

Vinyl Wall Art has a ton of other awesome decals on their website as well as available through etsy. And they were kind enough to offer to sponsor a giveaway for our readers for $25 gift certificates for 2 lucky winners so you can try their projects for your own home or DIY projects!

Wall Vinyl Art will provide a "voucher" that is as good as a PayPal credit - you can use it to pay for the item as well as shipping cost - what ever you want. It will maintain a positive balance until used, so you don't have to use it all at once if you want to buy a few small decals at a time!

Enter via Rafflecopter.
Giveaway is available worldwide!


  a Rafflecopter giveaway

Saturday, March 24, 2012

in celebration of Luca's arrival | organic elephant giveaway | little free radical

As a member of The Artisan Group, I had the opportunity to include one of my elephant softies  in a gift bag for Hilary Duff & her baby boy back in November made with organic fabric sponsored by
Birch Fabrics  from their Mod Basics collection and filled {with love} and bamboo-blend fiberfil!

This week, Hilary sent out this message on Twitter:

"Welcome to the world, Luca Cruz Comrie!  
Tuesday evening, we became proud parents of a healthy 7 pound, 6 ounce beautiful boy."

So, in celebration of Luca's arrival, we thought we'd give away an elephant softie identical to the one we gifted Hilary & Luca with in November! He measures 6x9" and is the perfect pal for your favorite kid!


Enter our giveaway below for a chance to win the elephant above! Giveaway ends at 11:59pm April 1, 2012


a Rafflecopter giveaway


These elephants are available to purchase for $20 at Little Free Radical on Etsy! 
Pin It

Friday, March 23, 2012

CIRKUSTÄLT children's tent makeover | ikea hack | little free radical


When I went to IKEA last fall to get the LÄTT children's table & chairs and APA toybox for Sophie, I saw this awesome little CIRKUSTÄLT children's tent  on display for just $19.99!!!
of course for that price I wanted to buy it, even if I disliked the colors but loved the shape/style and the size of the tent!

Of course, when you offer a tent for under $20, everyone wants one, so IKEA in Stoughton was sold out. I went home and looked online to see if New Haven, CT had any... then looked IKEA to IKEA to see if I could have a friend of of state ship one to me. everyone was sold out. and I was bummed. I found it on eBay in UK, but international shipping would have meant I'd pay $65 for the $20 tent, so I stalked IKEAs product availability online for weeks waiting til they got the tent back in stock.


But all the weeks of waiting gave me plenty of time to plot exactly what I did want to do with my tent!

CLICK HERE to read more

Sunday, March 11, 2012

creating toy storage with IKEA products | d.i.y. organization | little free radical

Since I've spent the last week posting DIY projects I did in my daughters room, today, I'm going to show you how I put all these projects together using IKEA's Expedit Bookcase for toy storage!

Originally, I had started out using itso cubes from Target (which I had already owned) for toy storage. It worked great, but as a parent in a wheelchair, I had a hard time reaching bins that low on the floor to clean up & get toys.

I tried re-stacking them differently but felt it was too risky to stack the cubes too high in case my 1 year old decided they would be great to climb. Instead, I started from scratch with toy organization.

First, I went through all the toys & resold the ones my daughter had 'outgrown' or had no interest in. Then I had some $$$ to work with to buy something to organize with, and I could see what I had left for toys to work with!

CLICK HERE to read more

Saturday, March 10, 2012

creative ways to hang art | d.i.y. | little free radical


For National Crafts Month DIY projects #9 & #10, I thought I'd show two easy ways to display art! I'm sure we've all been guilty of having random pieces of artwork left unframed for prolonged periods of time, right?

CLICK HERE to Read More

Thursday, March 8, 2012

bringing life to APA toybox | d.i.y. IKEA hack | little free radical

Pin It


I don't know how many times I passed by this boring little white box in the children's section at IKEA. It's only $14.99 but pretty plain and it didn't match my daughters room so I didn't give it much thought... until I saw the $20 LÄTT children's table & chairs displayed next to it...

CLICK HERE to read more

Tuesday, March 6, 2012

turning PRÄNT into designer boxes | d.i.y. IKEA hack | little free radical


Pin It


When I saw the PRÄNT box on IKEAs website for the first time, I was totally psyched! So, when I went to my local store to get a couple, I found out that everyone else was also psyched about them especially since they were only $12.99.... and there was only one left for me. :(

So, after a couple weeks of patiently waiting, they got more in stock, and I finally got my pair of boxes. BUT, the good news is that in the meantime, it gave me plenty of time to contemplate what i wanted to do with them! Unfinished wood boxes are totally like being handed a blank canvas - you can do whatever you want!


CLICK HERE to Read More
Related Posts Plugin for WordPress, Blogger...